Spring Product Release: AI-Powered Call Coaching & Grading, Custom Layouts, 24 Hour Call Report and More!

We’re excited to share that our latest REW CRM product release has officially started rolling out this week! With these new features comes a focus on additional customization options, streamlined workflows and processes, improved lead organization with new metrics, and AI integration—components that are designed to help you run your business more efficiently and effectively.

REW CRM's 2026 Spring Release
Curious about what’s included? Keep reading to explore what’s new.
Table of Contents
AI-Powered Call Grading and Coaching
Our first—and arguably biggest!—new feature is the integration of AI-Powered Call Grading and Coaching. This exciting feature analyzes transcripts of agent calls, provides coaching summaries and letter grades based on a variety of communication metrics, as well as tips for improvement. It integrates seamlessly with REW Dialer and texting, but does require a separate setup. So to get started, reach out to your Account Manager for assistance.
Once your account is all set up, viewing graded calls is designed to be a simple process.
1. To start, navigate to the the "Leads" homepage in the CRM.

2. Open a lead's call history. You can access this through their Lead Details Page, or by clicking on any of the lead's number of calls, in the “Calls” column of the Leads homepage.

3. Click into a call made through the Dialer. You can distinguish if a call is made from the Dialer by seeing the call duration (in minutes and seconds) displayed in brackets.
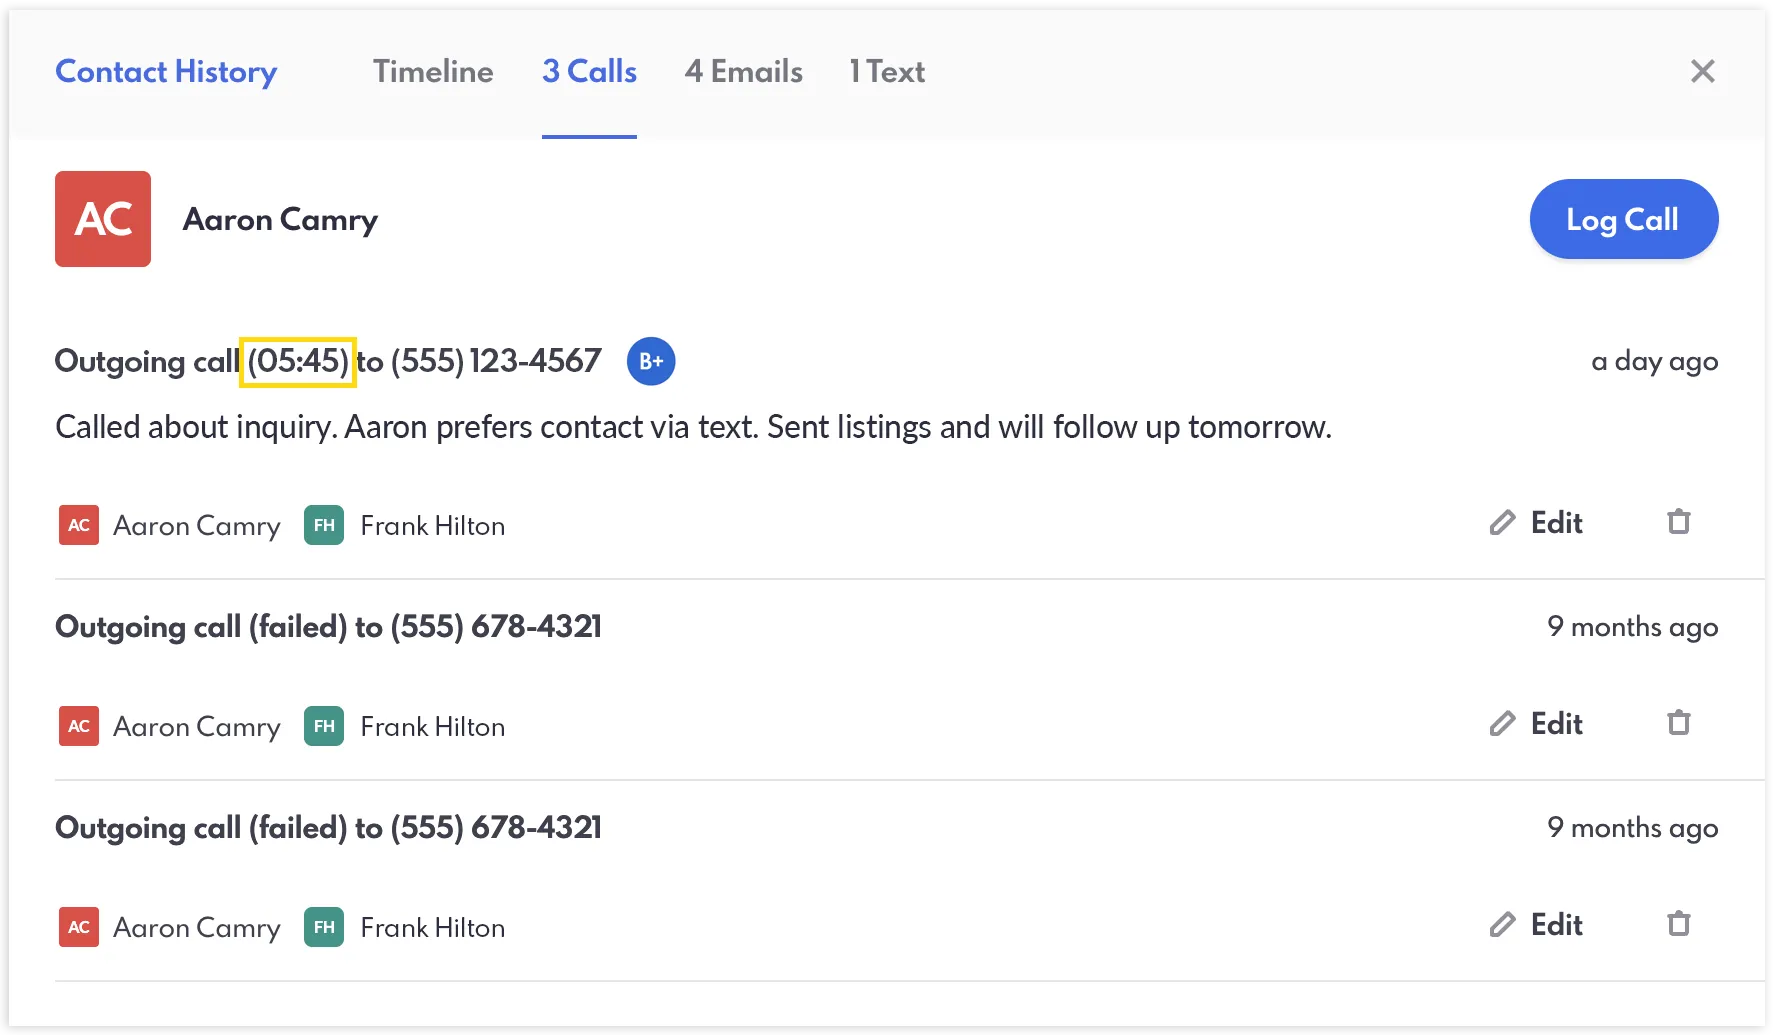
Important to note: Calls only made through REW Dialer will provide AI-generated transcripts, summaries, grades and coaching. Only calls longer than two minutes are graded, ensuring brief interactions like voicemails don’t impact scores with misleading low ratings.
4. Similar to transcripts and summaries, you’ll see new panels dedicated for "Call Scoring" and "Coaching". Expand the panels to view it's insights.

Opening up the "Call Scoring" panel will show you grades within the following criteria: Overall Score, Rapport & Emotional Intelligence, Discovery & Qualification, Market Expertise & Value Communication, Persuasion & Call Control, Call to Action & Next Step, and Relationship Nurture & Brand Representation. Alongside each grade, you’ll see a brief summary explaining how the score was determined.

These scores are calculated by AI based off of the transcript of the call. The Overall Score is determined from the average letter grades (F all the way up to A, respectively) of all other categories.
Underneath the Call Scoring is the "Coaching" section, which summarizes the call’s performance and provides brief tips and suggestions for future calls.

Custom Layouts For Lead Details
We’re also adding more customization options across the CRM, specifically for the Lead Details pages. Custom Layouts allow agents to personalize their own layouts, through reorganizing panels, based on the information most important to their workflow.
1. To access the Custom Layout manager, head to the "Leads" homepage in the CRM.
2. Next, click into any lead to open up the Lead Details page.
3. From here, navigate to the "Custom Layout" panel.

4. Selecting “+ New Layout” will open up the editing menu, which looks just like the regular Lead Details page, except with additional functionality.

5. Panels can be moved around if they have a dotted icon to the left side. Drag-and-drop panels to the left, center or the right of the page.

6. Clicking on the trash can icon can remove the panel from view—however it is not deleted, simply hidden. If you would like to bring it back at a later time, you can click on the "+" sign on the right side of the panel.
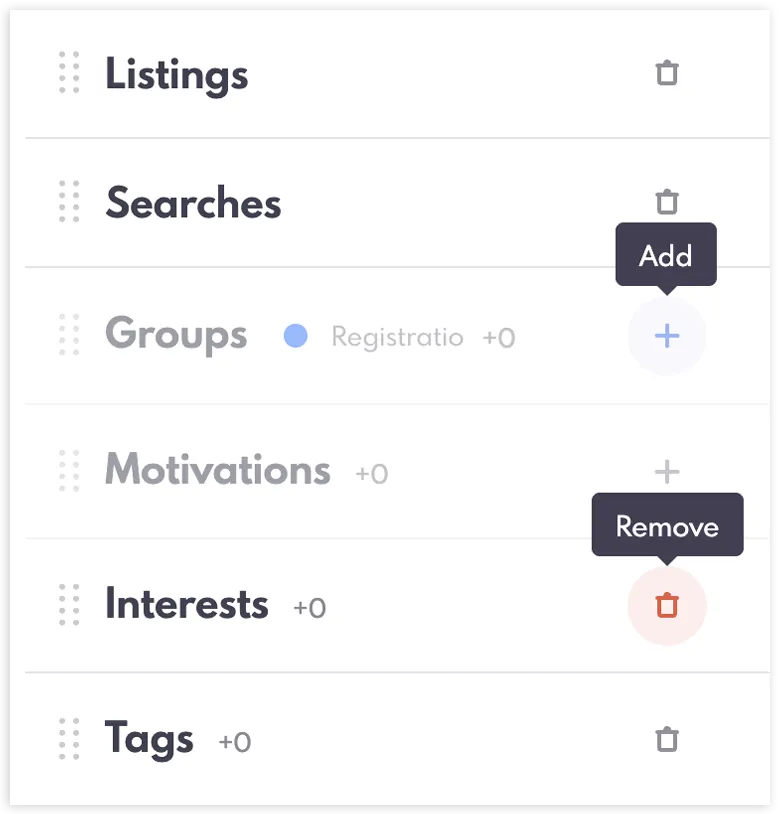
7. When you are satisfied with your layout, give it a name and can click "Save".
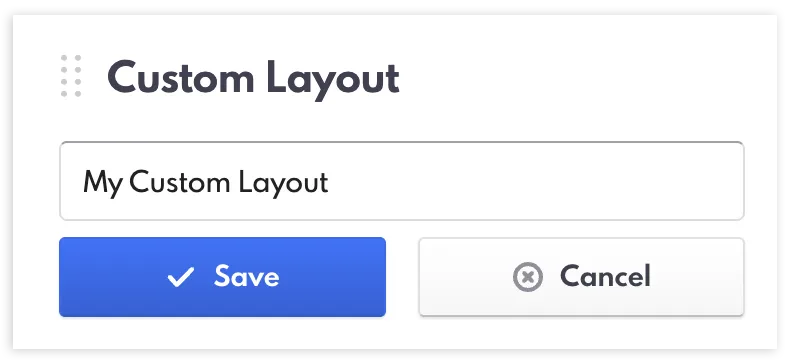
8. Additionally, you can edit existing layouts inside the same Custom Layout panel by selecting an existing layout, then clicking on “Edit Layout”. You can also delete a layout by clicking on the trash icon after selecting "Edit Layout".

Important to note: Each Agent profile in the CRM can customize their own Lead Details page, and layouts cannot be viewed by other Agents. You can open up any lead's detail page to do this, and changes will be applied across all lead profiles.
24 Hour Call Report
Next up is the 24 Hour Call Report: a feature that provides an hourly visual breakdown of agent activities throughout the day, making it easy to track performance, identify patterns, and stay on top of team engagement at a glance.
1. The 24 Hour Call Report can be viewed through the "Agents" homepage of the CRM.

2. Click on "My Setup" in the bottom left corner of the screen.

3. Select “24 Hour Call Report”, and the report will pull up in the same modal.

4. The report will default to showing the activity of all agents for the current day.
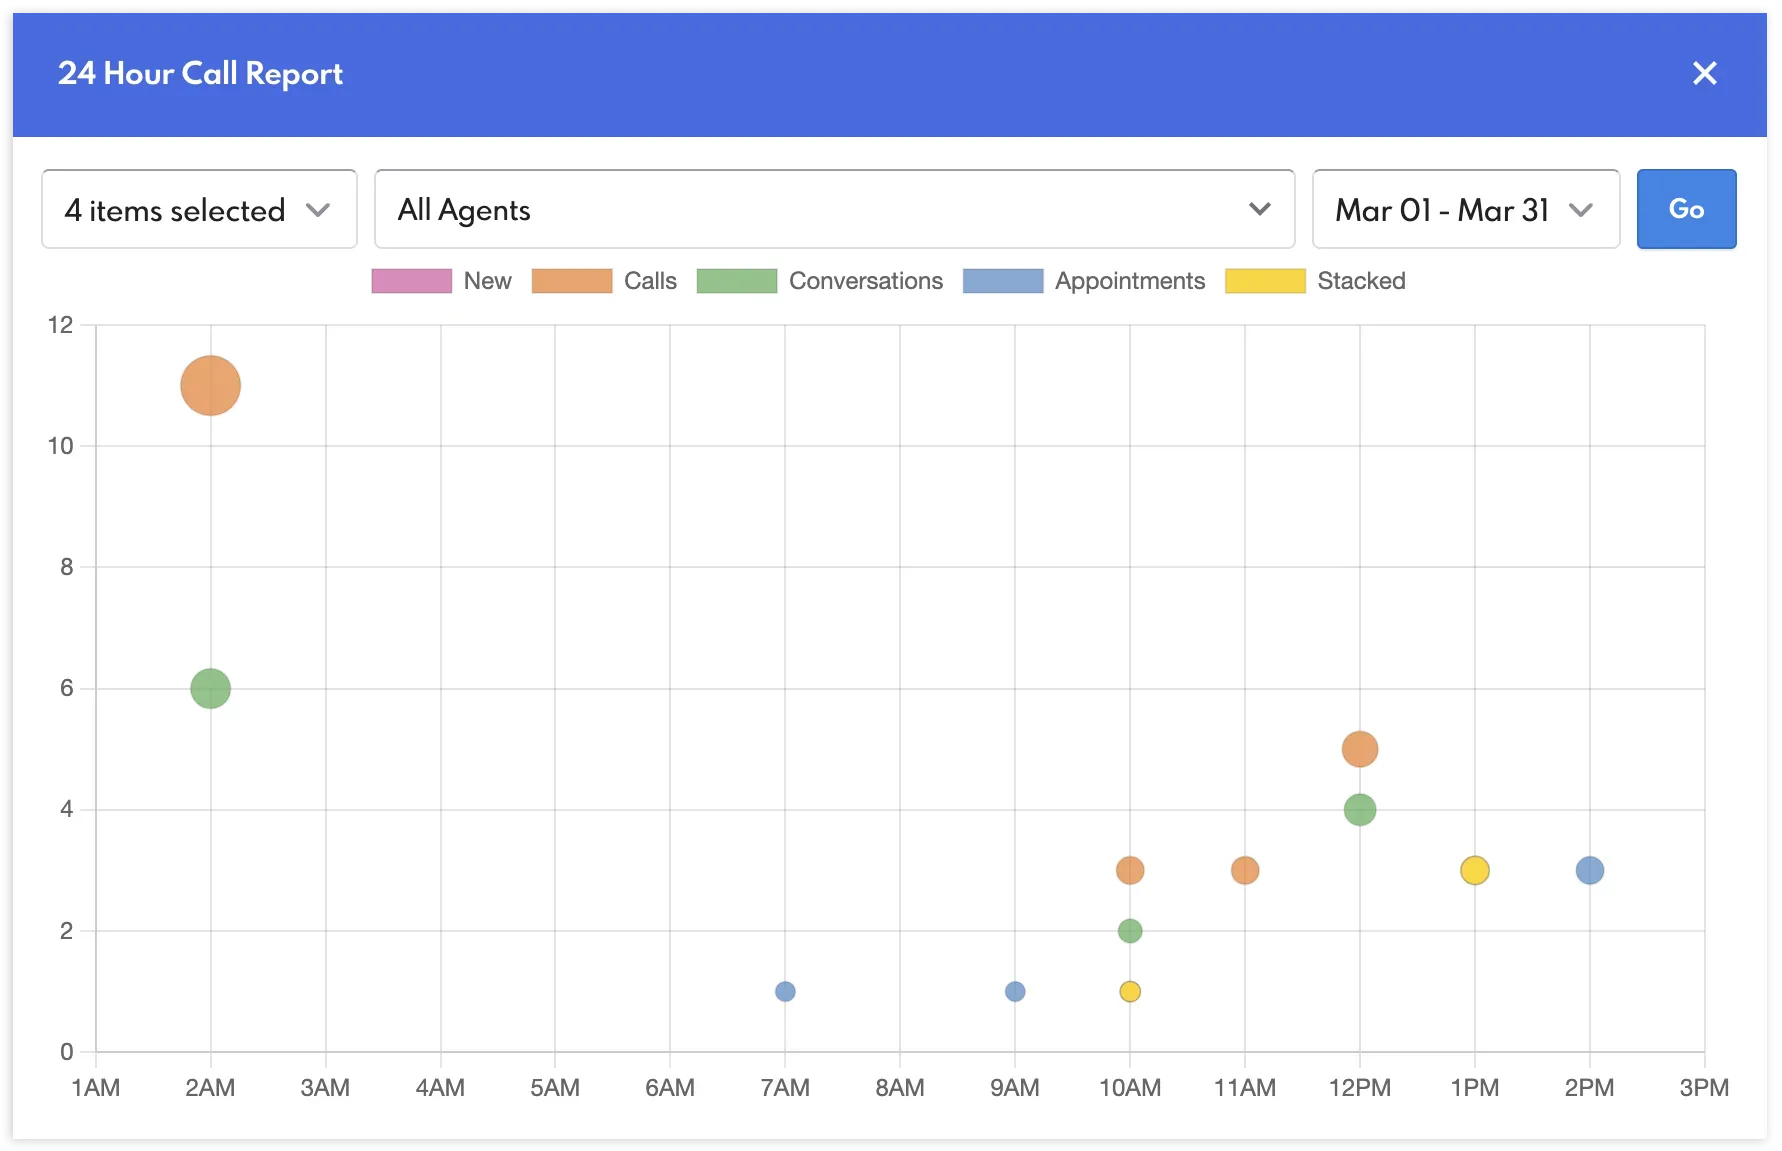
5. At the top of the graph, you can toggle what metrics to view/hide (Conversations, New Leads, Appointments and Calls), which agents to view the activity from, and the date range.
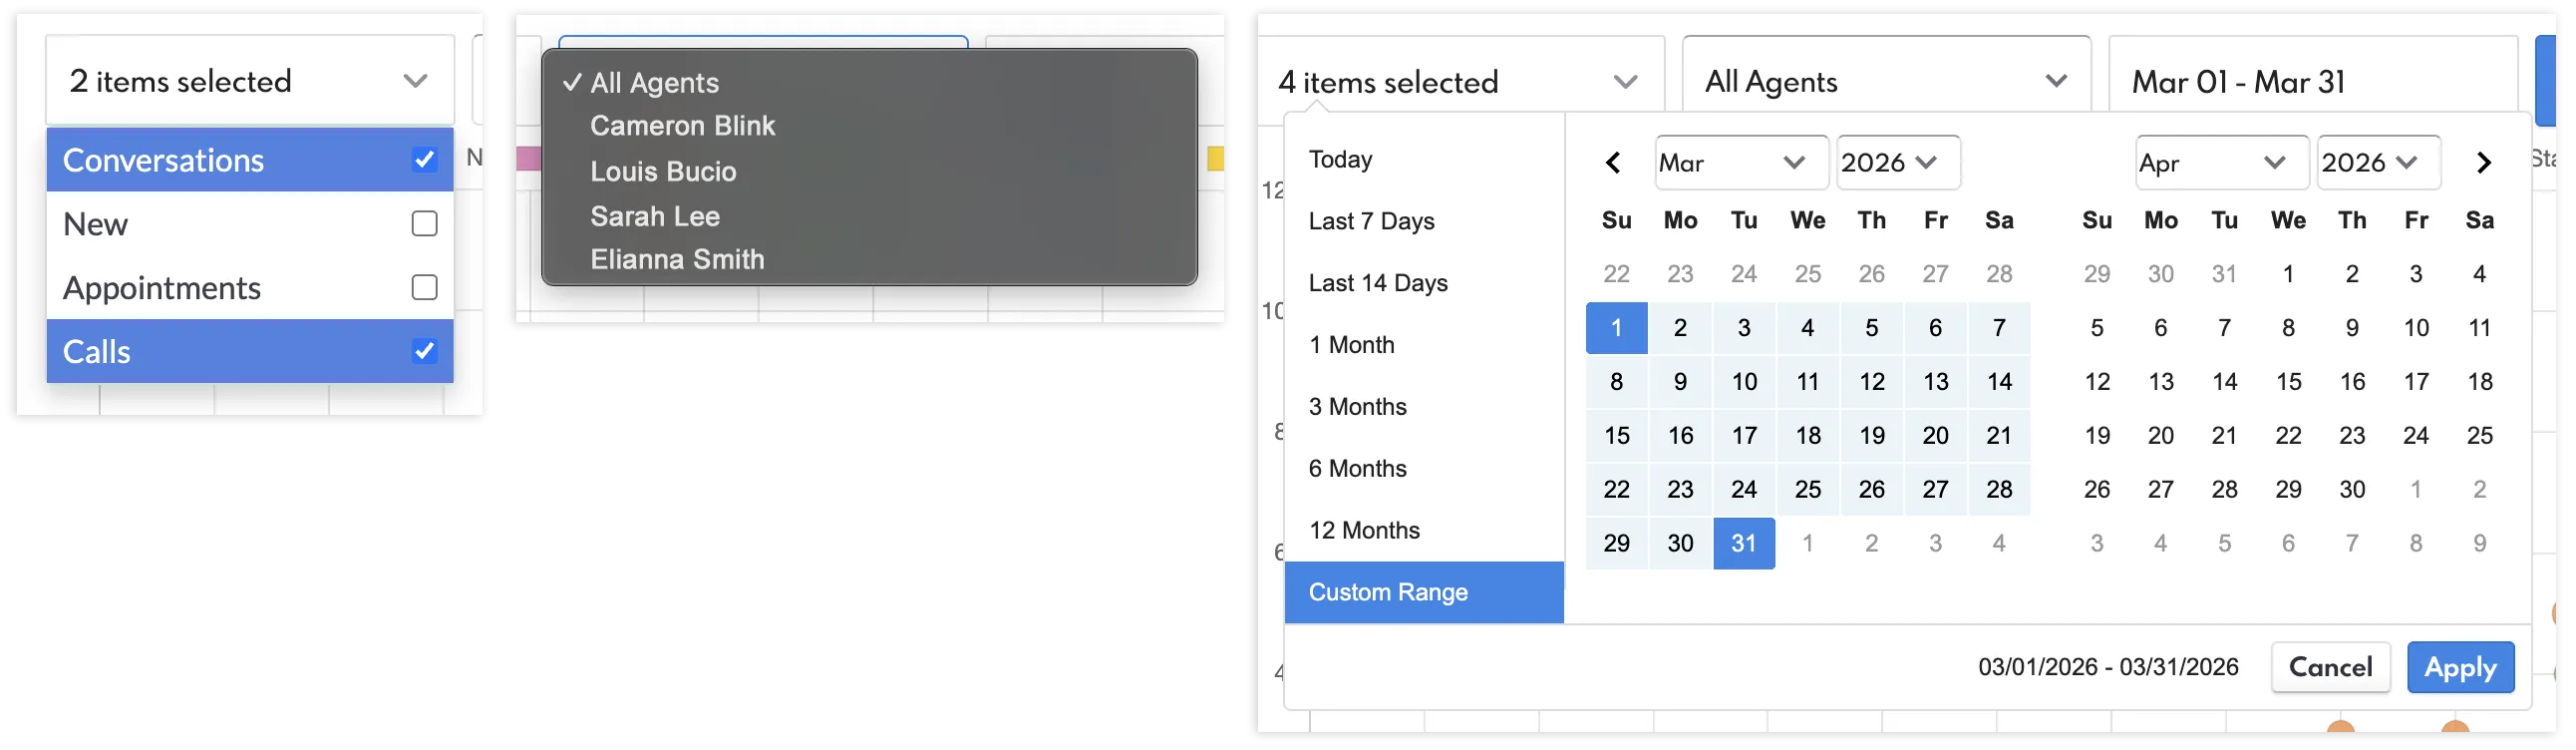
Data is graphed by frequency and time of day (divided into hours). As typical of a bubble chart, each metric is color-coded and the larger circles denote more activity. If two or more activities occur during the same time of the day, they will be labelled as "Stacked" and will be colored yellow. Hover over each circle to view the exact data of each metric.

Enabling Agent Permissions for 24 Hour Call Report
Super Admins will need to grant permissions to agents who want access to the 24 Hour Call Report. Follow these simple steps:
1. Navigate to the "Company" page of the CRM and select an agent you wish to set permissions to.

2. Within the "Agent Summary" dropdown, click on "Permissions".

3. Expand the "Agent Privileges" tab and tick the "View 24 hour Call Report" box to allow this agent to access the call report. With this enabled, the agent can only view their own metrics on the 24 Hour Call Report.

4. Additionally, if you tick the "Add & Edit Agents" box, this gives the agent the ability to view all agents data on the graph.

5. Hit "Save" to apply your changes.

Next / Previous Lead Navigation
This new navigation feature is designed to give users easier mobility when moving between different leads within Smart Lists, offering a smoother, more efficient experience. It’s another simple quality-of-life improvement that helps reduce extra clicks and keeps your workflow moving.
1. Head over to the "Leads" homepage in the CRM, and select a Smart List.

2. Click into a Lead within the Smart List to open up their details page. The new Lead Navigation will appear as a bar at the bottom of the lead page.

3. Use the "Previous" and “Next” buttons to quickly move between leads, and click on the button, labelled as your selected Smart List, to return back to that Smart List on the Leads homepage.

Quick Phone Status Update + Unverified Phone Icon
The Unverified status phone icon is new addition to the lead’s phone status, joining Verified, Bad Number, and Wrong Number. This visual indicator helps you quickly identify numbers that haven’t been confirmed, so you can prioritize validation and maintain cleaner contact data. In addition, we've made it easier to update your lead's phone status directly on the Phone column of the Leads homepage.
1. To view this, navigate to the "Leads" homepage in the CRM.
2. Within the "Phone" column, if a lead's number is yet to be confirmed, a yellow question mark will be allocated to indicate that it is unverified.
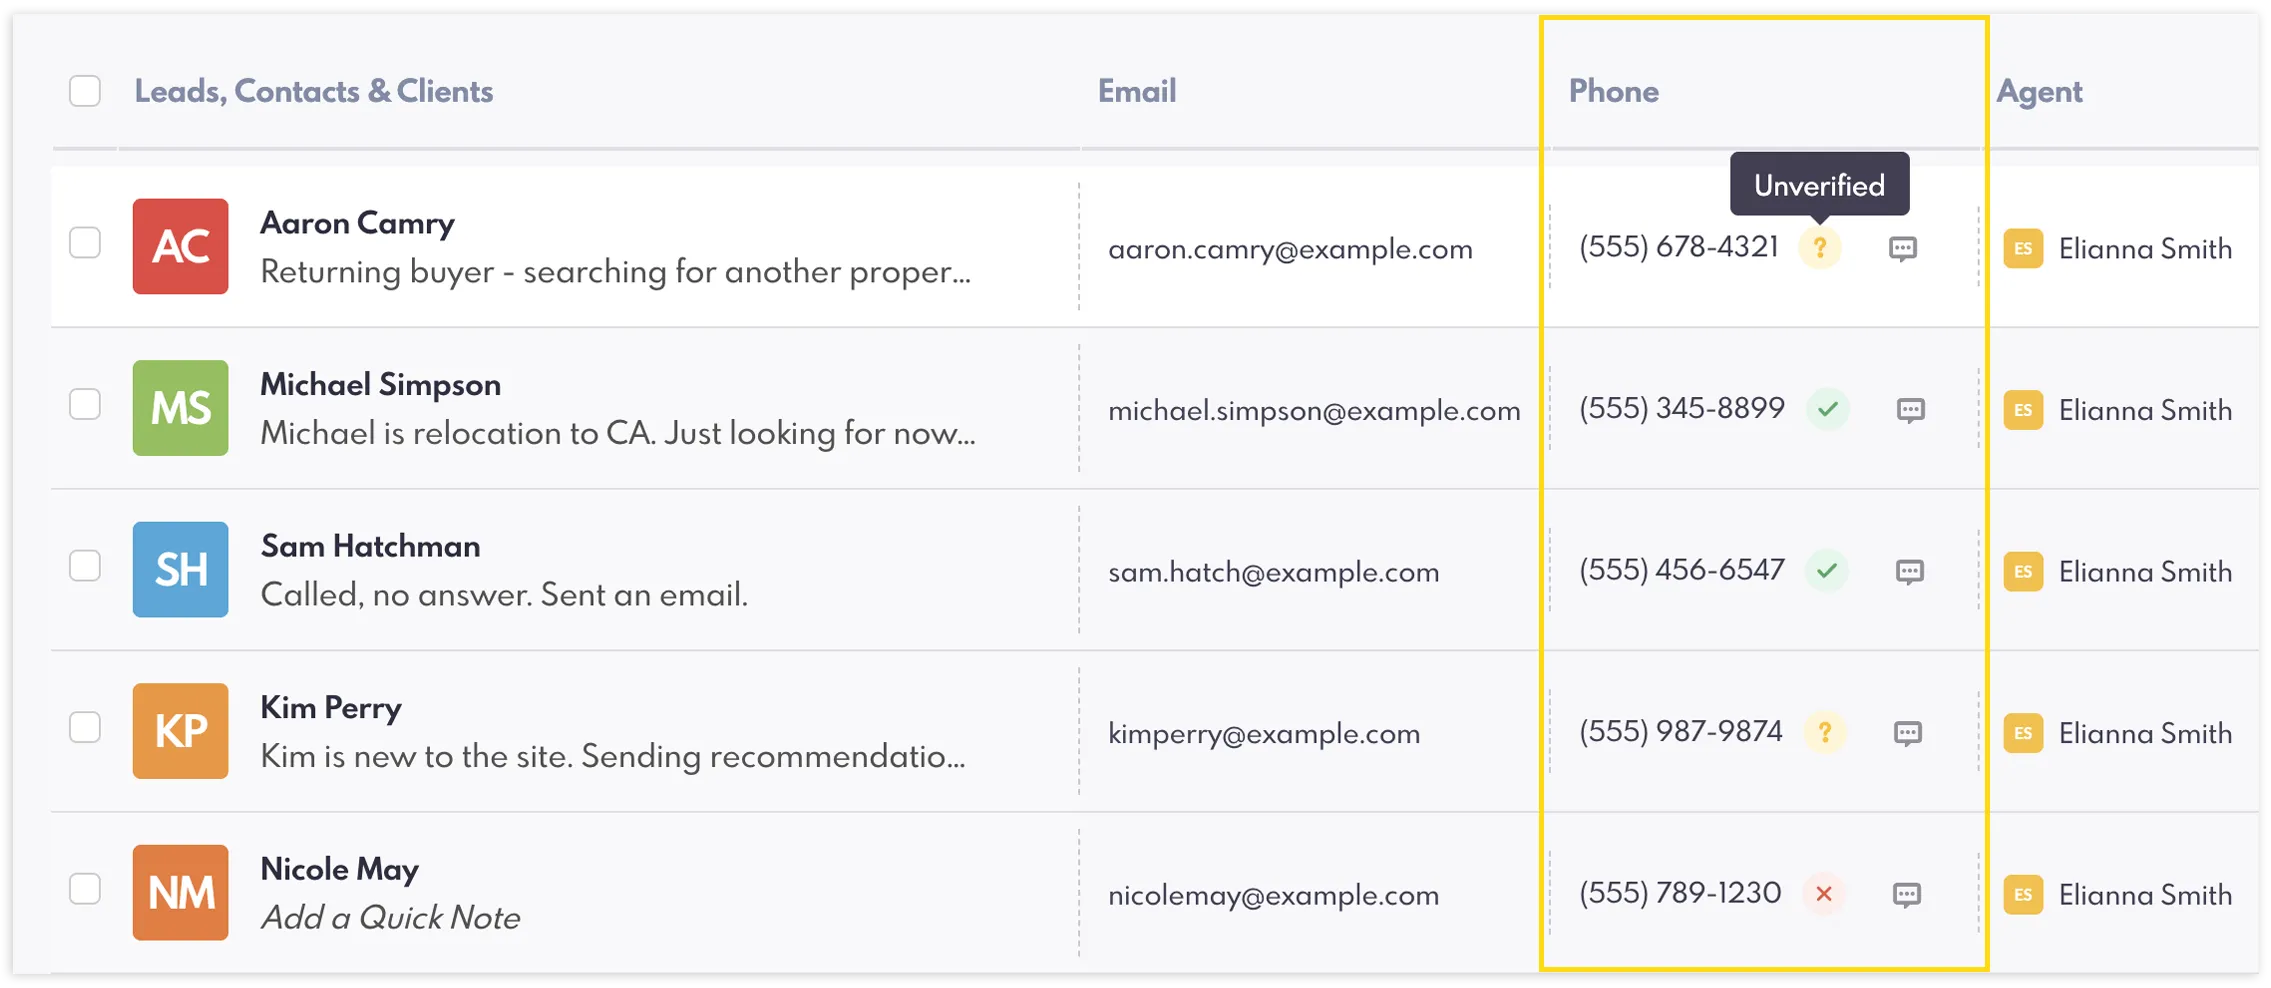
3. You can easily update the status (Unverified, Verified, Wrong Number, Bad Number) of these right from the Phone column. Simply select the icon to open the drop-down menu, and select the status of the phone number.

4. Alternatively, you can still edit this inside the Lead Details page if preferred. Click on the phone status icon next to the phone number, and within the fly-out menu, manually select the adjusted status. Make sure to save your changes.

Deals View Updates
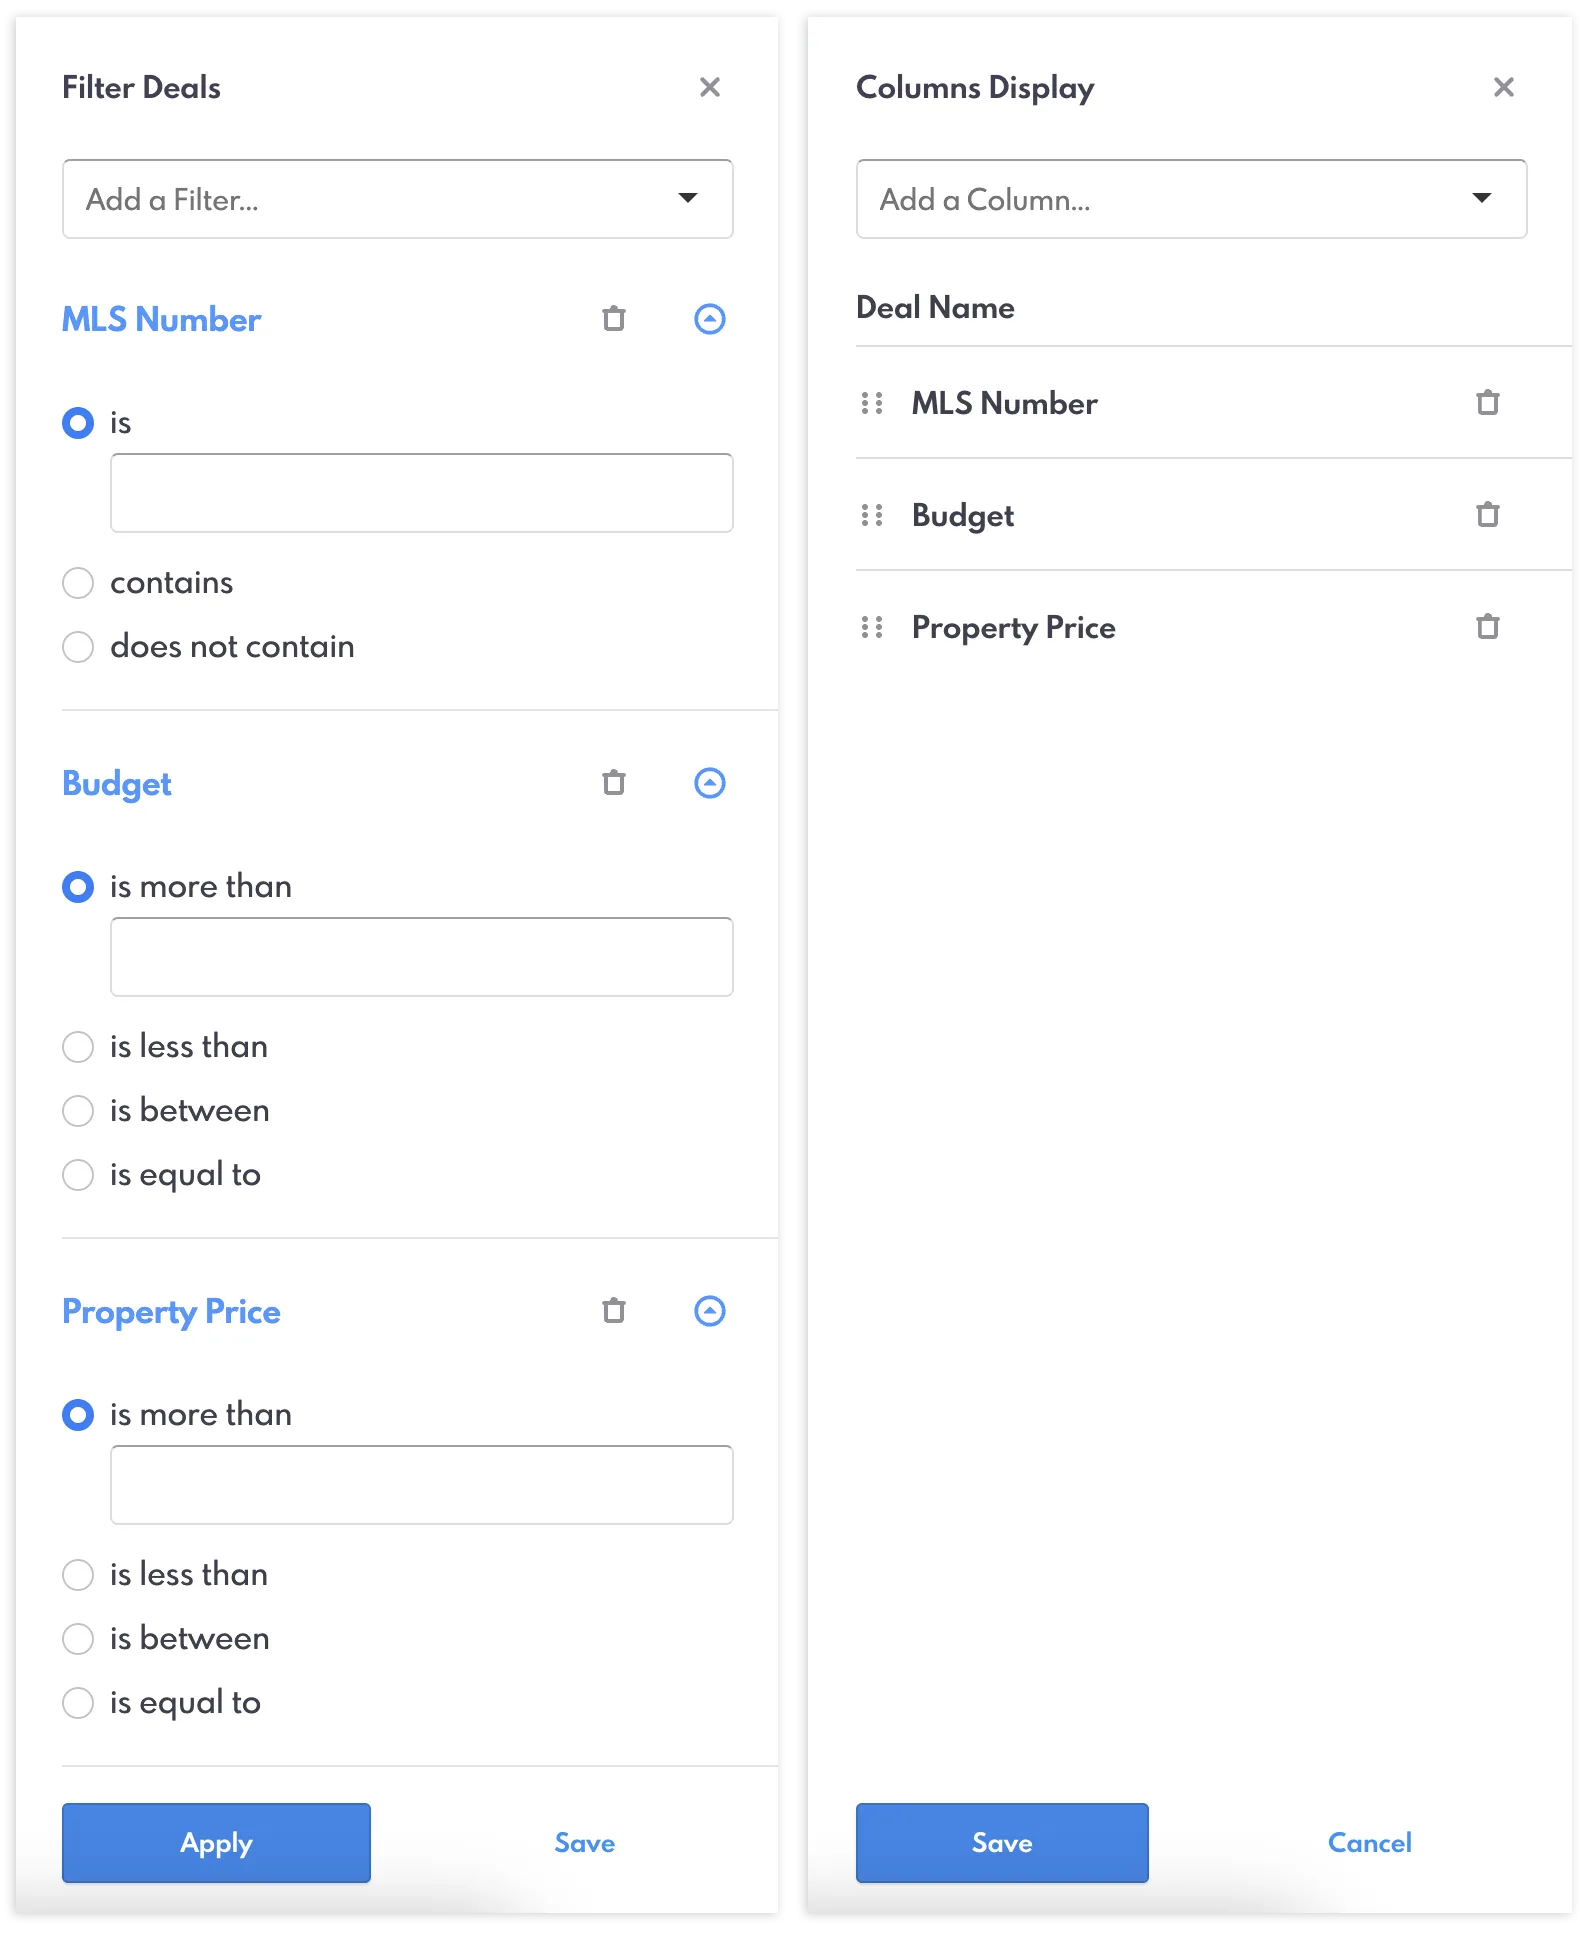
Lastly, we’ve made updates to REW Deals. Agents can now gain more visibility and control with the addition of an MLS Number field for new and existing deals. Plus, MLS Number, Budget, and Property Price can now be added to your Deals table as columns and filters, making it easier to organize, track, and manage your pipeline.
1. To view the new MLS Number field, navigate to the "Deals" homepage in the CRM, and select the blue “+ New Deal” button in the top-right corner.

2. This will open up a new deal page. Scroll down to the middle of the page and you will now see a dedicated field for "MLS Number", just underneath the Budget field.

Below are the new fields added to your filters and columns in the deals homepage:
- MLS Number (all deals)
- Budget (buy-type deals)
- Property Price (sell-type deals)
Why Upgrading To The Latest Renaissance Platform Matters
Access to REW’s newest features, product updates, and ongoing innovations is available exclusively on the GKE platform. All of the enhancements highlighted in our Spring Release are only being rolled out to users of our latest platform, making it essential for staying current with everything we’re building. If you’re still on an older system, upgrading to Renaissance ensures you don’t miss out on new capabilities, performance improvements, and future updates. If you’re not sure where your platform stands or what upgrading means for your business, take a look at our blog or reach out to your Account Manager to learn more.

The latest GKE Platform on Renaissance
Spring 2026 Product Release FAQ
What is included in the REW CRM Spring 2026 Release?
The Spring 2026 Release introduces several new features, including AI-Powered Call Grading & Coaching, Custom Layouts for Lead Details, the 24 Hour Call Report, improved lead navigation, enhanced phone status updates, and expanded Deals view capabilities.
How does AI-Powered Call Grading & Coaching work?
This feature analyzes call transcripts from the REW Dialer, assigns letter grades across key communication categories, and provides coaching insights to help agents improve performance and conversations over time.
Are all calls graded by AI?
Only calls made through the REW Dialer and lasting longer than two minutes are graded. This ensures short calls, like voicemails, don’t negatively impact performance scores.
What are Custom Layouts for Lead Details?
Custom Layouts allow agents to personalize their Lead Details page by dragging and arranging panels based on their workflow. Each agent can create and manage their own layouts independently.
What is the 24 Hour Call Report?
The 24 Hour Call Report provides a visual, hourly breakdown of agent activity, including calls, conversations, appointments, and new leads. It helps teams track performance trends and engagement throughout the day.
How does the Next / Previous Lead Navigation improve workflow?
This feature allows users to move seamlessly between leads within a Smart List without returning to the main list, reducing clicks and improving efficiency when managing multiple leads.
What is the Unverified Phone Icon?
The Unverified Phone Icon is a new addition to lead phone statuses, alongside Verified, Bad Number, and Wrong Number. It helps agents quickly identify numbers that haven’t been confirmed and update statuses directly from the Leads page.
What updates have been made to the Deals view?
A new MLS Number property is now available for all deals. Additionally, MLS Number, Budget, and Property Price can be added as filterable columns in the Deals table, improving visibility and pipeline management.
Do I need to upgrade to access these new features?
Yes. All features in the Spring 2026 Release are available exclusively on the GKE (Renaissance) platform. Upgrading ensures access to the latest tools, performance improvements, and future updates.